Renaming A Column In Power Query Based On Position
/The easiest way to rename a column in Power Query is to do it the same way you do in Excel - just double-click it and rename it. Sometimes though the column you are renaming can have different names with each refresh, so this method won’t work. We can use a List in Power Query to make this dynamic. Consider this very simple example:
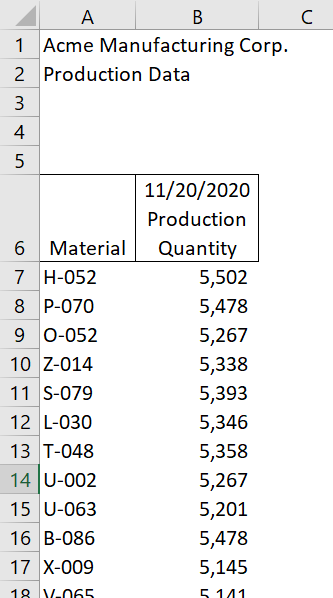
You receive this file every day, and the column name starting in Row 6, Column B, constantly changes. We are going to extract that date and make it a column, as it should be, and then rename both columns regardless of what they are called.
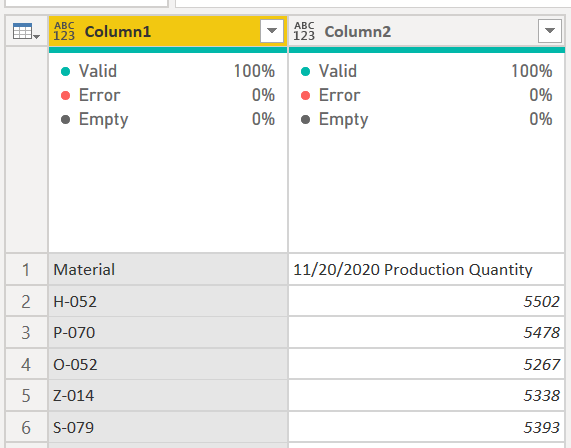
The first thing we do after importing the Excel file into Power Query is to remove the first 5 rows. Use the Remove Rows button on the Home ribbon, and remove the top 5 rows. If your data has rows that move around a bit because someone inserts or deletes rows above it, see this blog post on how to dynamically find that first row and remove the appropriate number of rows. Now we have something that looks like this:
Ok, let’s get to work. NOTE: If you had any “Changed Type” step created by Power Query, delete it. That will cause problems in the refresh. We’ll add it back at the end when our column names are predictable.
1) We need that date in a new Date column so we can relate it to a Date table later. If you have a date in your date model, you always need a good date table.
2) On the Add Column ribbon click Add Custom Column. Name the column “Date” and use this formula:
try
    Date.FromText(
        Text.BeforeDelimiter([Column2], " ")
        )
otherwise null
You don’t have to have the line breaks and indents, it just makes it easier to read. Let’s break this down from the inside out:
Text.BeforeDelimiter([Column2], “ “) - in the first row of data, this will return the “11/20/2020” text. In all other rows it will return errors, because there is no spaces in the other rows, and those are numbers, so there is no text to extract. That isn’t a problem and you’ll see why in a minute.
Date.FromText() will take the date in the first row and convert “11/20/2020” to a real date. In all other rows, it returns errors.
The try/otherwise construct says “Try this formula. If it works, give me the result. Otherwise, return null.” It is like IFERROR() in Excel. This is why the errors don’t matter. The try/otherwise construct takes care of it.
Now our data looks like this:
3) Right-click on the Date column and select the Fill menu, then Down. Now the date will fill the column.
4) On the Home ribbon, click Use First Row as Headers. Again, remove any automatically added “Changed Type” step if Power Query added one. Now we have this:
Both the 2nd and 3rd column need to be renamed, and we cannot double-click to rename, otherwise the refresh will fail tomorrow when the date changes to Nov 21, 2020. If you did double-click though, this would be the formula Power Query would generate:
= Table.RenameColumns(
    #"Promoted Headers",
    {
        {"11/20/2020 Production Quantity", "Production Quantity"},
        {"11/20/2020", "Date"}
    }
)
We need to replace the first part of the renaming list (the list is in the curly brackets). We can use a function called Table.ColumnNames() for this. To see how it works, remove your manual renaming step, and type in this formula, and you will get the list shown below. It is each column name in the table from the Promoted Headers step.
= Table.ColumnNames(#"Promoted Headers")
To use this we need to get the column names from the 2nd and 3rd row. To get items from a list, you can refer to the index of an item in the list using curly brackets again, so change your formula to this, and you’ll get the column name shown below.
= Table.ColumnNames(#"Promoted Headers"){1}
You’ll notice I used {1} to get the second item in the list. Power Query indexes at zero, so {0} would return the first item. Now you see where this is going?
5) Delete any steps you have up to the Promote Headers. Once again, manually rename the headers. This is so Power Query will generate the Table.RenameColumns() step for us and we will make minor tweaks. It should be this again:
= Table.RenameColumns(
    #"Promoted Headers",
    {
        {"11/20/2020 Production Quantity", "Production Quantity"},
        {"11/20/2020", "Date"}
    }
)
6) Replace the “11/20/2020 Production Quantity" with Table.ColumnNames(#"Promoted Headers"){1} and replace “11/20/2020” with Table.ColumnNames(#"Promoted Headers"){2}. It should now look like this:
= Table.RenameColumns(
    #"Promoted Headers",
    {
      {Table.ColumnNames(#"Promoted Headers"){1}, "Production Quantity"},
      {Table.ColumnNames(#"Promoted Headers"){2}, "Date"}
     }
)
It is dynamically finding the column name of the 2nd and 3rd columns and replacing it with specific text!
As always, set the data types for all columns at this point too now that we know what our column names will be.


